I’ve been thinking about writing this post for a while – a non-designers guide to cover design.
Whether you create your own cover or get somebody else to do it, its helpful to understand some of the fundamentals of graphic design so that you can judge whether its working or not. What follows are not “rules”. More like guidelines and tips. You will probably find many great covers that do not abide by these guidelines, but they are a useful place to start from.
Design for your readers, not yourself
It is very tempting to base your design choices on what you know about your book.
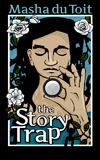
For example, you choose your font because that is the font that is used on your main character’s Tarot Deck. Very nice and meaningful except that… the font is not that legible, and it looks like the kind of font used on Romance books and your book is Sci Fi. Dont get emotionally attached to elements of your design. Everything must work to support the purpose of the cover. Get rid of everything else. (Kill your darlings?)
Perform this test:
Look at your cover and pretend you dont know anything about the book. Keeping that ignorance firmly in mind – what message are you getting from each of the elements that make up the cover? What personality does the font bring across? Do the colours convey an appropriate mood? What story does the image tell (remember, you dont know anything about this book!)
Where does your eye go first?
Each cover is made up of a number of elements. Title, author name, all the separate bits that make up the image used, and so on. Some of these are more important than others, but they all have a role to play. Some are the stars of the show, others are a supporting cast. In a good design, the viewer’s eye is drawn to the most important element first, then moves to the second most important, and so on down the hierarchy. To get this to happen, designers use visual tricks like making the most important elements bigger, brighter and in general, more eye-catching. The design-speak term for this phenomenon is “visual hierarchy”
If all the elements in your cover are more or less the same size, they are competing with one another for attention, and as a result the viewer’s eye moves from one to the other randomly, not sure what to look at first.
There are no hard and fast rules about this. You could for example decide to make the title and author name at the same level of importance.
This visual hierarchy is important for the cover image as well. A rule of thumb is that very comlex cover images with many different people and things usually dont work that well. Usually! There are many exceptions to this “rule”. Your cover image should convey clearly what’s the most important element. Always check – what is your eye drawn to first when looking at this image? It is more difficult to design an effective cover with an image of a crowd, than of a single person. Not impossible – just difficult.
Some examples of using visual hierarchy to improve a cover:
Starting with this one:

Here are some versions in which the scale and placing of the elements have been adjusted. Which one do you think works best? And more importantly: can you define exactly why that one works best for you? When you look at them, be aware of how your eye moves from one element to another. What happens when something is bigger, higher up, centered, a different colour and so on.


The spaces between things are just as important as the things themselves
When you place something on a cover, it has a shape. Obviously! But there is another shape you need to consider, and that is the shape of the space around that thing. In design-speak, this is called the “negative shape” or “negative space”. This negative space is just as important as the positive shapes of each of the elements in your design, and should not look arbitrary.
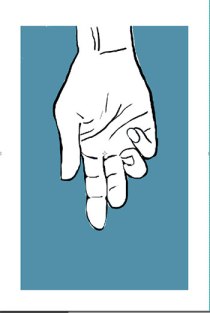
For example, here is a positive shape:

And the black area is the negative shaped created by this element:

The parrot is just floating arbitrarily in the middle – the negative space around it is not working hard to make the design stronger. It looks like the parrot was just dropped where it was without any consideration of the space around it.
Here is another attempt:

And here is it’s negative space:

The shape of this second example’s negative space is much more eye-catching, a strong, well defined shape.
Do everything with purpose: Make overlaps, spaces and alignment work for you
Make everything in your cover look as though you meant it to be that way. So if things overlap, overlap them thoroughly. If there are spaces between things, space them generously. If you have two elements that just touch one another, for example if you cover image just touches the title text – that can look like a mistake. Either overlap them more, or move them apart so they are clearly separated. The same goes for placing elements near the edges of your cover. Either put a proper margin of space between the element and the edge, or place it so it is clearly goes “off stage”.
The same goes for lining things up. Dont just place things arbitrarily, be aware of their position in relation to one another. Either line up your Title and Author name exactly or position them so they are clearly not aligned. Either make them exactly the same width..or make them clearly different widths. Dont make them nearly the same – that looks like a mistake.
An example. The cover below has some alignment and layout problems:

The problems become more apparent when I put in grid lines to show what is lined up with what:

Some of these problems can be solved by making sure that things are lined up, the same width, centered etc:

- The gun is moved back so it no longer just touches the edge of the cover
- The gun now has space in front of it for it to “move into” – same rule for people. Dont have a person facing out of a cover, give them space to “look into”.
- Moving the gun upwards and left turns it into a frame for the white space between the gun and the title. That makes the space part of the design, instead of just being ignored extra stuff around the edges of the elements.
- The left edge of the gun is lined up with the left edge of the title and author name.
- The title and author name are lined up and centered – so the margin of space between them and the cover edges are the same on both the left and right.
- The margin of space between the author name and the bottom edge is slightly wider than the side margins – this often looks good.
Lots more could be done to improve this cover, but it’s a start!
I’ve left out a lot, but these are the things I check first. Do you have any other design tips?


Recent Comments